How to Take a Good Selfie: Tips to Look Your Best

Knowing How to take a good selfie isn’t about having supermodel bone structure (thank goodness for that!). And it definitely doesn’t require a filter that removes your pores, your nose, and any trace you’ve ever experienced a human emotion.
As an award-winning brand photographer with 18 years helping real people look great on camera, I can tell you this: the women who take the best selfies are simply the ones who’ve learned what actually works. One of my Slay Your Selfies students even took a self-portrait that ended up in Forbes! They know a good thing when they see it!
Here’s a surprising fact: many of the most flattering selfies don’t actually involve holding your phone at all. Intrigued? Well, indeed you should be!
Even though I’m in photos all the time, I still stress about my own pictures too — my weight goes up and down – colossally at times, and some days all the vibes I’ve got equates to “meh”. So believe me – If I can take photos I actually like, you absolutely can too.
In this guide, I’m going to walk you through my top tricks – from lighting, angles, posing and simple yet devastatingly effective shortcuts that transform awkward snaps into photos where you look like the goddess you truly are. You are very welcome.
The Quick-Start Formula for Taking a Good Selfie
Here’s a simple four-step formula you can use immediately.
Think of this as your foundation. Get these right and you’re already ahead of most people who are still taking selfies standing in pub toilets with overhead lighting that makes them look like they’re auditioning for a zombie film.

- Face a flattering light source. And I don’t mean a low fat salad cream whispering sweet nothings.
Turn towards a window or stand in open shade outdoors. The light should fall softly on your face. Not blast down from overhead like you’re being interrogated about where the money is.
This single change transforms photos more than any filter ever could.


2. Position your phone slightly above eye level.
Not dramatically high. We’ve all seen that angle where the phone’s so high it looks like it was taken by a drone.
Just a touch above your eyeline. This naturally lifts and defines your features in a way that feels polished rather than “trying desperately hard to improve my jawline.” Yes we all know what’s going on.


3. Choose a clean, uncluttered background. Sadly this does mean a reason to get onto that pile of washing that’s been there since Thursday. Sorry about that.
A messy background distracts from your face and makes even good photos feel chaotic.
Nobody needs to see your laundry pile. Or that mysterious cable situation behind the sofa. Or your other half wandering past in his pants. We want to look good, and there’s sometimes a thing called a little too much authenticity.

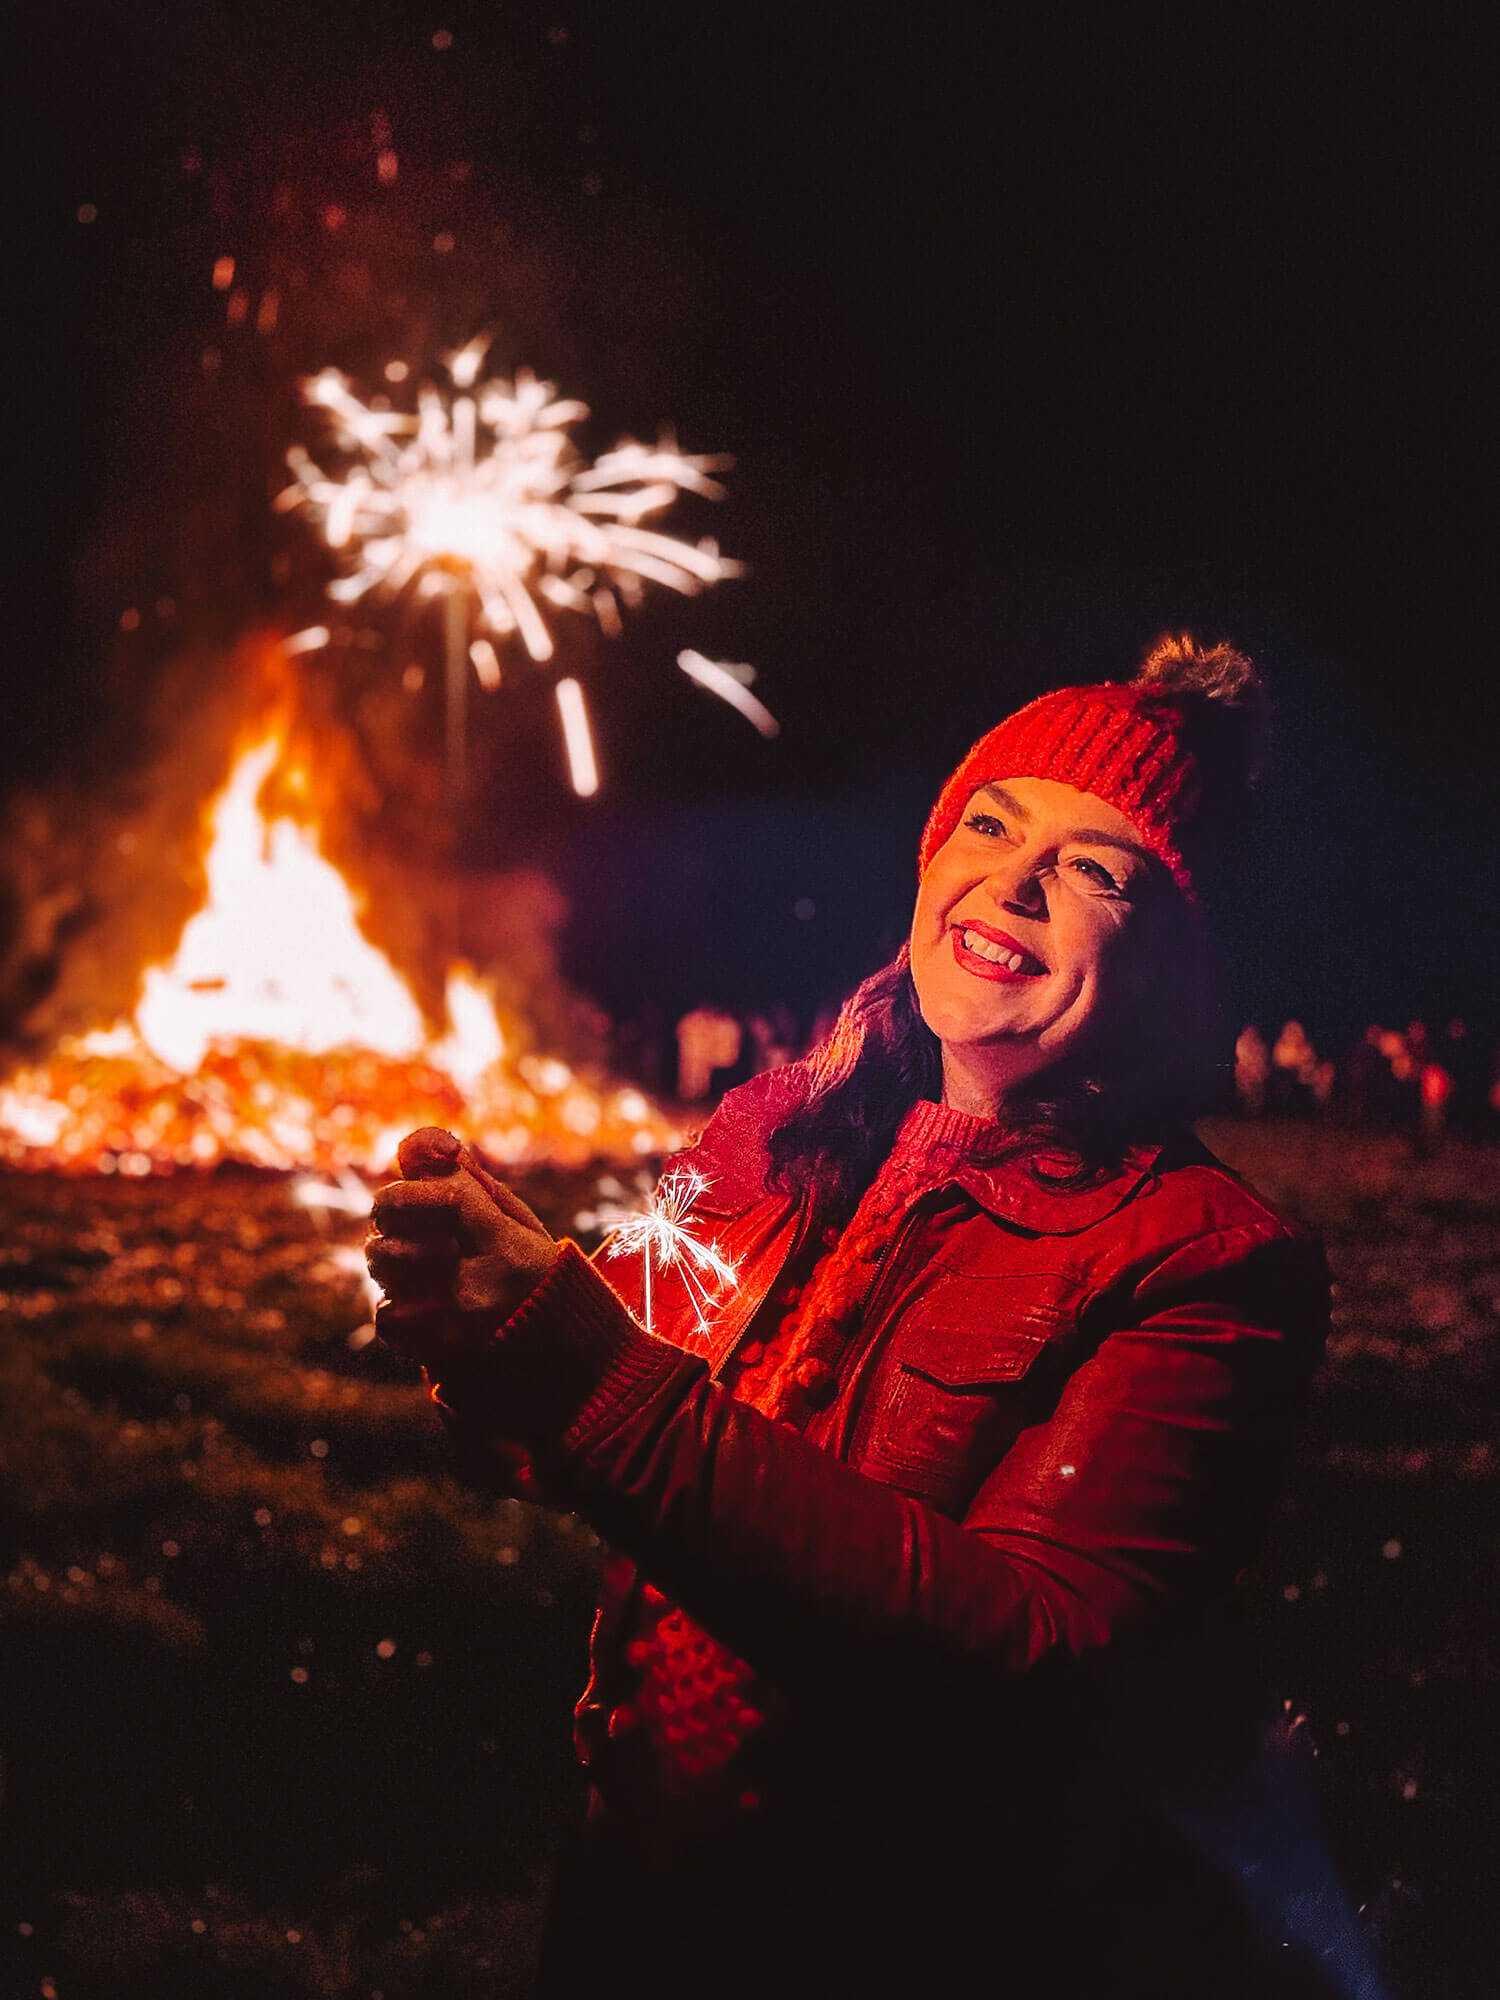
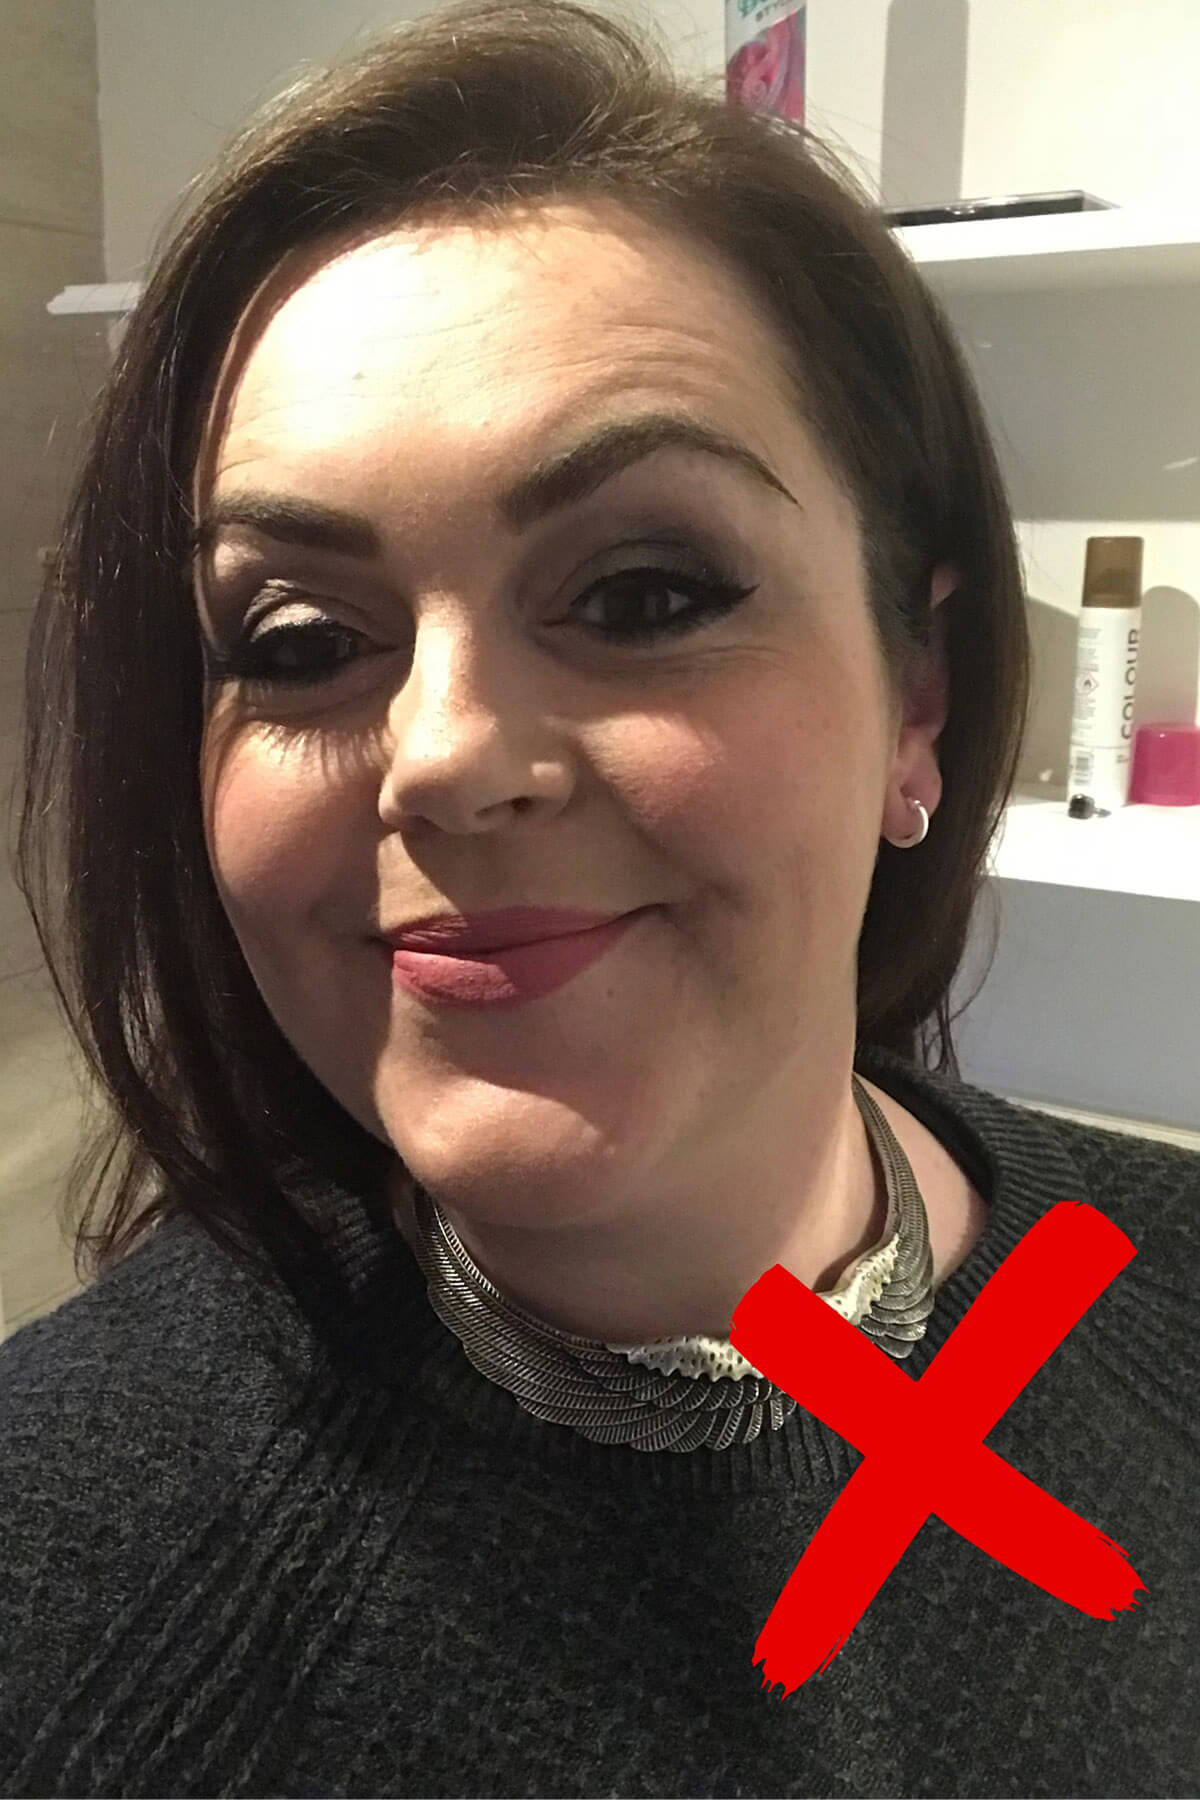
Let’s try to avoid the #awkward face
Selfie portrait of me, taken with a tripod selfie stick and clicker, with my Slay Your Selfies method
4. Add a little movement. You don’t have to be the next Strictly Champion, but give me a little razzle dazzle!
Your selfie position matters almost as much as your expression.
Instead of freezing like a startled deer in headlights, try shifting your weight, adjusting your hair … or if you really can’t bare the cringe, even just taking a breath and breathing out just before you shoot.
This creates natural energy in the image. It helps you avoid that stiff, hostage-video expression we all know and dread.
How to Take a Good Selfie: Top Tips That Actually Work
Now… (imagine me talking in hushed tones, looking over my shoulder anxiously for outsiders listening in and for some reason I’ve also gone full South London accent)… let’s get into the down and dirty, top secret detail of what you need to know to take a top notch selfie.
These are the techniques I’ve developed over 18 years of photographing women for their businesses. Like precious wisdom of old I pass these golden nuggets down to you.
They work whether you’re twenty-five or sixty-five. Whether you’re having a “good face day” or one of those mornings where you wake up still with last night’s makeup on and look like you’ve aged fifteen years overnight.
(Just me?)
The number one thing I hear from clients arriving at their shoot is that they are unphotogenic. Not that they feel unphotogenic. But they ARE unphotogenic. 🙁
The worst story I heard was that another photographer had told one of my clients years ago that they were unphotogenic (like seriously – who the heck would say that?!) and it stuck.
Perhaps a throwaway comment at school made you feel self conscious about your nose, teeth or double chin? So many unkind or thoughtless words can really stick with us for life when the person who said them has long forgotten about it!
The thing is, even the most confident, successful businesswomen I photograph—women who speak on stages and run empires—often feel genuinely vulnerable in front of a camera.
You are absolutely not alone in this.
But the good news is – actually you are lovely! And you can absolutely be photogenic once I’ve finished with ya! Once you understand the principles of how to take a good selfie, everything becomes easier. Hooray!

You Don’t Have to Use Your Arms to Take a Selfie
This is the life changing tip that is going to rock your socks off. And as of yet, hardly anyone talks about it.
When you hold your phone at arm’s length, you’re limited to one basic angle. Your arm gets tired. Your shoulder hunches up somewhere around your ear. You end up with that slightly tense expression that says “I am concentrating very hard on not dropping my phone in the toilet.”
Worse, the wide-angle lens on your front-facing camera distorts your features. It makes your nose look larger and your face appear rounder than it actually is.
Marvellous. Just what we all needed.
The solution? Put the phone down and step back.
“But Rosie, how will I then be able to take a picture?!” I hear you ask in confusion!
Well mon cherie – you can use your camera timer (most phones give you three, five or ten seconds options) and prop your phone against something!
A coffee cup works brilliantly. So does a stack of books, a plant pot, a sauce bottle in a restaurant (done it), or a handy tree with obliging branches (also done it).
Or as per my favourite option… you could use a tripod that doubles up as a selfie stick. They’re really lightweight and portable. I have a recommended one that I suggest to all my students.
My handbag is never without one. Always photo-ready. #AnotherDayAnotherSlay
Propping up your phone lets you position the camera at a distance. You can use the sharper, high quality rear-facing camera. And you can actually relax your body like a normal human being.
I’ve taken some of my favourite selfies by leaning my phone against a mug on a café table, setting the timer, and sitting back with my coffee looking casually into the middle distance. I may feel like a goon, but I look good in my picture!
Nobody watching would even know I was taking a photo. They probably thought I was just a woman really enjoying her flat white with deep meaningful thoughts. Aha, fooled them!
The result? A natural, relaxed image that looks like someone else took it. Which is exactly what we’re after.
You can also buy inexpensive remote shutters that connect via Bluetooth. Press the tiny button hidden in your hand and the phone takes the shot. I like these a lot – I just wish I didn’t lose them so often!
This tip alone is an absolute game-changer for anyone who wants professional-looking content without hiring an actual photographer. And no need to have an Insta husband available on demand. I’d call that a win for everyone involved!
For more on the technical side of distance, angles, and what makes photos actually flattering, I’ve written a full guide on how to take good pictures of yourself.

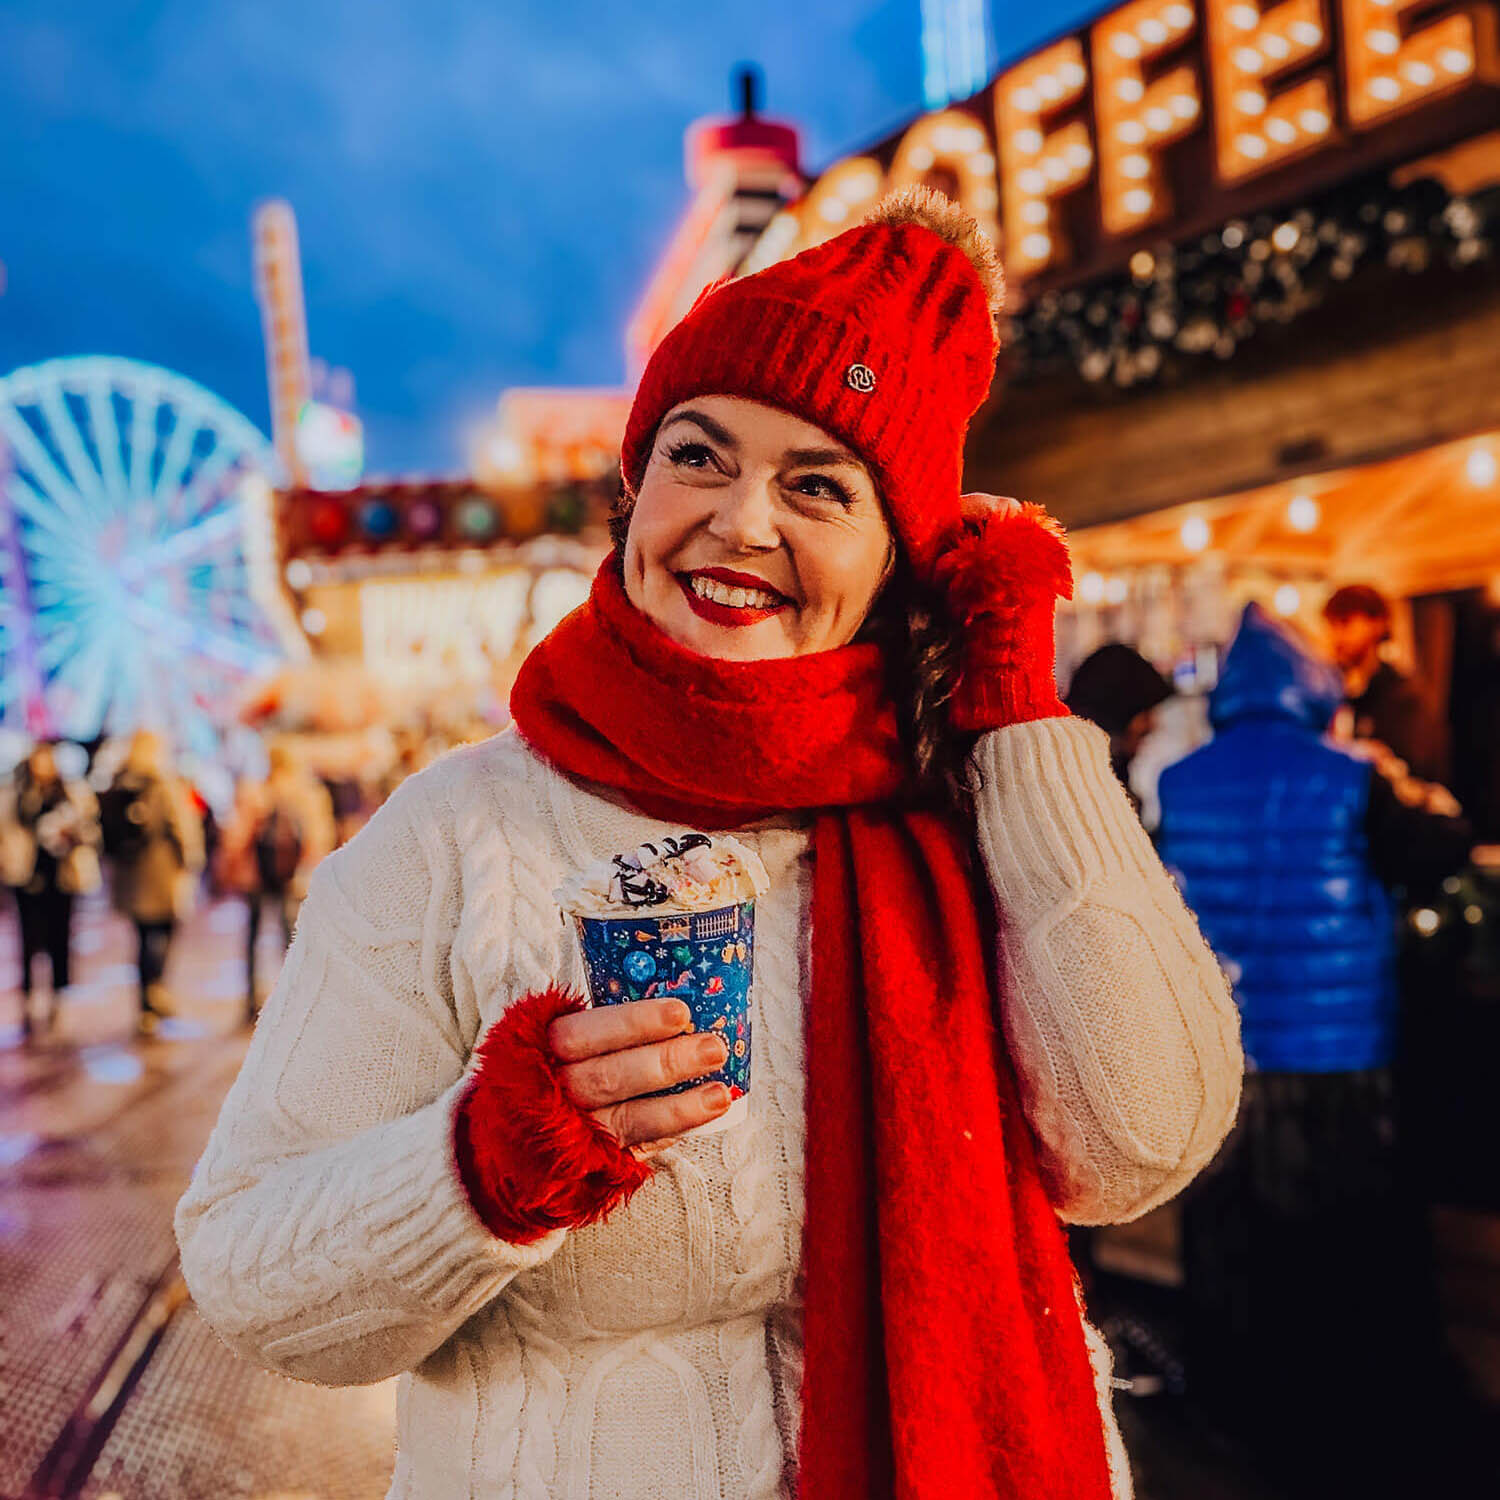
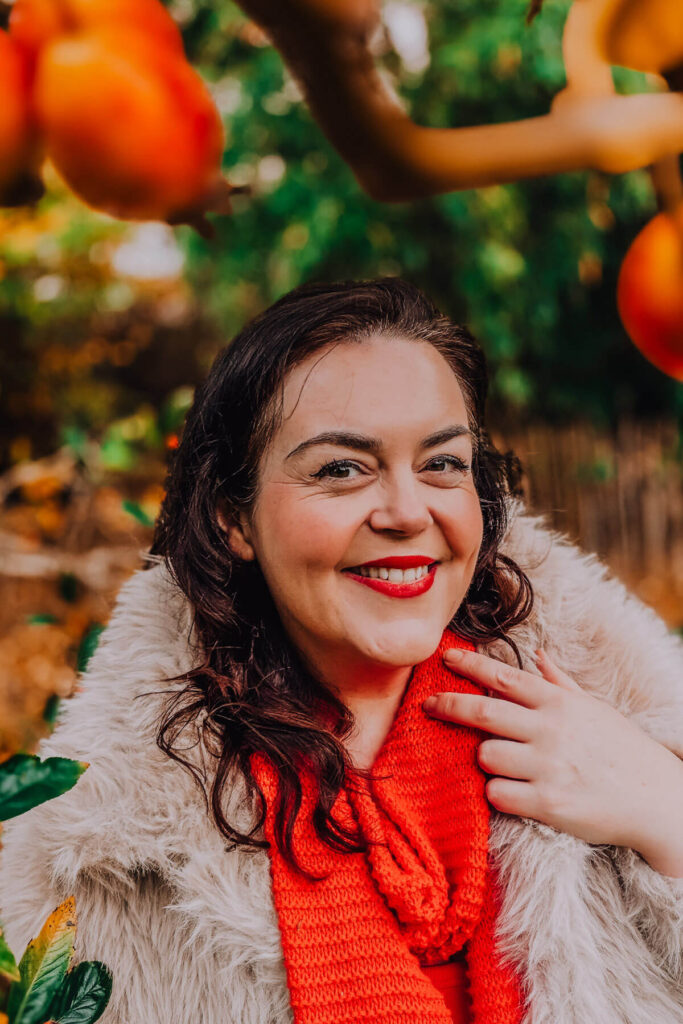
Selfie portrait of me at Peggy Porschen, London taken on my iPhone 15
Mastering Natural Lighting
Good lighting is the single biggest factor in whether a selfie looks professional or like it was taken in a bunker during an apocalypse.
Forget ring lights for a moment. They have their place, but they’re not essential. What you really need is soft, directional natural light.
The best light source for selfies is a large window with indirect light. Face the window so the light falls evenly across your face.
If direct sunlight is streaming through, diffuse it with a sheer curtain or move to a spot where the light is softer.
Direct sun is not your friend. It highlights every pore, every fine line, every bit of tiredness you’re carrying. We don’t need that kind of brutal honesty.
Outdoors, open shade is your best friend.
Stand under a tree canopy, in the shadow of a building, or on a covered porch where the sky acts as one enormous softbox.
The light wraps around your face beautifully. No harsh shadows that add ten years and a vague air of “hasn’t slept since 2019.”
Golden hour—the hour after sunrise or before sunset—produces that warm, glowy quality you see in gorgeous travel photos.
The kind where people look sun-kissed and relaxed rather than sweaty and squinting.
If you’re planning a content day, schedule your outdoor shots for these times. You’ll notice a dramatic difference.
Flattering Angles and Finding Your Good Side
Most people have a side of their face they prefer. Even if they’ve never consciously noticed it.
Spend five minutes taking photos from slightly different angles. Chin tilted up versus down. Face turned a few degrees left or right.
You’ll quickly spot which feels most like you. Or at least, most like the version of you that you’d happily put on the internet.
A classic flattering angle is to turn your face about fifteen degrees away from the camera, then bring your eyes back to the lens.
This creates dimension. It avoids the flat, passport-photo look that makes everyone look vaguely criminal.
Tilting your chin very slightly down and forward helps define your jawline. Imagine a turtle gently poking its head out of its shell.
Elegant, I know.
It feels utterly bizarre when you do it. But trust me—it photographs beautifully. I do it in every single photo and I’ve never once felt graceful doing it.
I’ve photographed celebrities who’ve flat-out refused to try a pose because they were convinced it would look terrible. Then they loved the result when they saw it.
Posing well doesn’t come naturally to anyone. Not models, not actresses, not that woman on Instagram who seems to nail every shot.
We’ve all just practised until we found what works.
Lean in Slightly
Here’s another trick I use constantly: lean your torso very slightly towards the camera.
Not so much that it’s obvious. But just enough that your face becomes a bit larger in the frame than your body.
Your eyes draw people into the photo. This subtle lean makes you look engaged and interested rather than stiff and distant.
Subtle Tweaks That Help Your Features Shine
Small adjustments make a surprisingly big difference in selfies.
These are the tricks models and actors use that nobody tells the rest of us about until we’ve been doing it wrong for twenty years.
Pushing your tongue against the roof of your mouth while smiling helps define the area under your chin.
Sounds completely barmy. Works brilliantly. Nobody will ever know you’re doing it.
Relaxing your jaw before you shoot prevents that clenched, tense look many of us default to when a camera appears.
If you’re anything like me, the second a lens points in your direction, your entire face forgets how to arrange itself naturally.
Take a breath. Unclench. Maybe have a little shake out if nobody’s watching.
Watch your shoulders too. I see this constantly when photographing clients.
They’ll be smiling beautifully, but their shoulders are hunched up around their ears with tension. It shows in the photo, even if you can’t quite put your finger on why.
Before you take the shot, consciously drop your shoulders down and back. You’ll look instantly more relaxed and confident.
And here’s one most people don’t notice: check your hands.
I cannot tell you how many times I’ve photographed someone whose face and body look lovely, but their hands are gripping onto their leg or the chair like they’re on a turbulent flight.
We do it without realising. But it’s a dead giveaway that we’re not comfortable. It shows in the final image.
Consciously relax your fingers. Let them be soft.
If you wear glasses, tilt them very slightly forward on your nose to reduce glare. Or angle your face so the light source isn’t reflecting directly off the lenses.
Nothing ruins a good selfie quite like two white rectangles where your eyes should be.
Avoiding Harsh Shadows and Direct Sunlight
Direct sunlight is not your friend when it comes to selfies.
It feels counterintuitive. Surely more light is good?
But direct sun creates hard shadows under your eyes, nose and chin. It makes you squint like you’re trying to read something very small and far away. And it shows every single bit of texture on your skin.
We don’t need that level of detail. Nobody does.
If you’re outdoors on a bright day, find shade.
Stand with your back to the sun if necessary and let the open sky light your face instead.
Alternatively, wait for a cloud to pass overhead. Overcast conditions produce beautifully soft, even light.
Finally, a reason to appreciate British weather.
Indoors, avoid standing directly beneath overhead lights.
They create unflattering shadows that make everyone look like they haven’t slept in a week. Even if you’ve just had nine hours.
Instead, face a window or lamp that lights you from the front or side.
How to Get Sharper Shots and Avoid Camera Shake
Blurry selfies usually come down to one of two things: camera shake or the camera focusing on the wrong spot.
Both are fixable, thankfully.
Hold your phone with both hands if possible. Tuck your elbows into your body. Take a breath before pressing the shutter.
Better yet, use the camera timer so you’re not jabbing at the screen and wobbling the phone at the crucial moment.
There’s nothing worse than taking what feels like the perfect shot, only to find you’ve captured a lovely photo of a flesh-coloured blur.
Tap your screen to tell the camera where to focus. Specifically, tap on your face.
Most phone cameras will adjust both focus and exposure when you do this. It often improves the image dramatically.
Otherwise, the camera might decide to focus on that very interesting lamp behind you instead.
If your phone has burst mode, use it. Take ten shots in rapid succession and pick the best one.
Even professional photographers rarely get the perfect shot first time. We just take hundreds and pretend we nailed it immediately.
Natural Smile Tips
Nothing ruins an otherwise lovely selfie faster than a forced, uncomfortable smile.
You know the one. Where your mouth is technically smiling but your eyes are screaming “please let this be over.”
The trick is to create genuine emotion right before you take the shot.
One of my favourite techniques when photographing clients is to ask them to imagine their favourite person in the world is standing behind the camera.
Sometimes it’s their partner. More often… it’s Ryan Reynolds.
Either way, that split second of genuine warmth and amusement shows in your eyes. It completely transforms the photo.
If a full smile doesn’t feel right, try a soft, closed-mouth smile or a relaxed, open expression.
Not every selfie needs teeth. What matters is that your face looks at ease rather than held together by sheer force of will.
Practise your smile in the mirror. Not to perfect it, but to get used to seeing your own face.
The more familiar you are with how you look when you smile—really smile—the less awkward you’ll feel trying to recreate it for a camera.
Using Portrait Mode Properly
Portrait mode on most smartphones blurs the background to create that professional, depth-of-field effect you see in magazine photos.
When it works, it looks absolutely gorgeous. When it doesn’t, you end up with half an ear missing and a chunk of your hair floating mysteriously in mid-air.
The key is distance.
Portrait mode needs you to be far enough from the camera that it can detect the edges of your face accurately.
If you’re too close, you’ll get weird blurring around your hair, ears or jawline. It makes you look like you’re slowly dissolving.
About two feet away from the lens is usually ideal. Another reason arm-free selfies work so well.
Good lighting helps portrait mode work better. In dim conditions, the software struggles to separate you from the background.
The effect can look artificial. More “bad Photoshop” than “professional photography.”
Check the edges of your image after you take it. If the blur has eaten into your hair or created odd halos, either retake with more distance or skip portrait mode for that particular shot.
No shame in it whatsoever.
Helpful Editing and Filters (With a Light Touch)
A little editing can enhance your selfies without making them look fake.
The goal is to polish. Not to create a version of yourself you wouldn’t recognise in the supermarket.
Brightness and exposure adjustments help if your original image was slightly too dark. Lift the shadows to reveal detail in your eyes and hair.
A touch of warmth often makes skin tones look healthier. Cool, blue-toned images tend to feel clinical. Like a passport photo or a police mugshot.
Neither of which is the vibe we’re going for.
Subtle sharpening can bring back detail lost in compression, particularly around the eyes.
As for filters: use them sparingly.
Heavy filters scream “I’m trying very hard to look like someone else.” They can obscure the natural beauty of a well-lit photo.
If you look at the result and think “that’s lovely, but who on earth is she?”—the filter has gone too far.
Selfie Poses You Can Copy Today
Posing is where most people get completely stuck.
The second we have to do something deliberate with our faces and bodies, we forget how humans normally stand. We end up looking like we’ve never had limbs before.
Here are some reliable options you can use straight away.
Start sitting or leaning.
When I photograph clients, I always ease them in with a pose where they can sit or lean against something.
It takes the pressure off. It gives you something to do with your body. It feels much less awkward than standing in the middle of a room wondering what to do with your arms.
Lean against a wall. Sit on a chair. Rest against a doorframe. Anchor yourself and you’ll instantly feel more comfortable.
The head tilt.
Simply tilt your head gently to one side.
It creates softness and interest without looking posed. Works beautifully for headshots and casual content alike. Almost impossible to get wrong.
The hair touch.
Bring one hand up to your hair. Tuck it behind your ear, lift it slightly, or rest your fingers at the nape of your neck.
This adds natural movement. It gives you something to do with your hands, which is genuinely half the battle.
The chin rest.
Rest your chin lightly on your hand, elbow propped on a table or knee.
It frames your face nicely. It feels more relaxed than standing there with your arms dangling awkwardly at your sides wondering what hands are for.
The over-the-shoulder.
Turn away from the camera, then look back over your shoulder.
This creates a dynamic, candid-feeling shot that works particularly well outdoors. Very “casually caught in a moment” even though you absolutely planned the whole thing.
The laugh.
Instead of smiling on command, make yourself laugh genuinely and capture that moment.
Even if your mouth is open mid-giggle, real laughter photographs better than a frozen grin.
Think of something funny. That thing your friend said last week. Yes, that one.
The look-away.
Gaze off to the side or slightly down instead of directly at the camera.
This creates an editorial, thoughtful vibe that suits professional content. Very “lost in important thoughts” even if you’re actually thinking about whether you remembered to defrost dinner.
If you’d like step-by-step pose sequences and detailed guidance, my course Slay Your Selfies walks you through everything in a really easy, encouraging way.
Common Selfie Mistakes (And How to Fix Them Fast)
Even when you know the basics, a few sneaky mistakes can sabotage your efforts.
Here’s what to watch for. I’ve made every single one of these myself, so absolutely no judgement from me.
Holding the phone too close.
That wide-angle lens distortion I mentioned earlier? It gets worse the closer you are.
Your nose grows. Your face rounds out. You end up looking nothing like yourself.
Either use a timer and step back, or invest in a tripod selfie stick. Your actual face shape will thank you.
Choosing a busy background.
A gorgeous outfit and perfect lighting mean nothing if there’s a bin, a pile of washing or someone’s elbow photobombing from the corner.
Always check what’s behind you before you shoot.
Over-editing.
It’s tempting to smooth every pore and brighten every feature until you look like a porcelain doll.
But the result rarely feels authentic. And honestly, people can tell.
Aim for “polished version of myself on a good day” rather than “AI-generated human who has never experienced stress.”
Tensing up.
Stiff shoulders. Clenched jaws. Frozen expressions. Hands gripping on for dear life.
The camera picks up on all of it immediately.
Take a breath. Shake out your shoulders. Consciously relax your fingers. Remind yourself that you can delete any photo you don’t like.
Nobody ever has to see the awkward ones. That’s between you and your camera roll.
Ignoring the light.
I cannot stress this enough: bad lighting undermines everything else.
If a location has terrible light—and you’ll know because you’ll look vaguely grey and like you might be coming down with something—move somewhere else.
No amount of editing fixes a harshly lit photo. Believe me, I’ve tried.
Taking just one shot.
Professional photographers take hundreds of images to get a handful of keepers.
Give yourself the same grace.
Take twenty selfies. Pick the best two. Delete the rest. Tell absolutely no one how many attempts it actually took.
Using the front camera when you could use the rear.
The rear-facing camera on most phones produces sharper, less distorted images.
Yes, you can’t see yourself while you shoot. But that’s what timers and burst mode are for.
The results are worth the mild guesswork.
Not checking your outfit on camera.
I do this myself. You don’t always know how something will look on camera until you take the picture.
Have your best guess at what you want to wear. But check the photos as you go.
If something isn’t working, change it while you’re still in good light. Don’t discover the problem when you get home.
How to Take a Good Selfie for Business or LinkedIn
Professional selfies need to strike a balance. Approachable enough to feel human. Polished enough to be taken seriously. These photos are part of your personal brand – the visual impression people form before they ever speak to you.
You want to look like someone people would actually want to work with. Competent, warm and like you’ve got your life at least somewhat together.
(Even if behind the scenes things are slightly chaotic. We’ve all been there.)
Here’s the thing: if you’re not confident, it shows in a photo. Even if you can’t quite explain how.
That’s not a great look when you’re asking people to trust you with their money. You want to look confident and friendly.
These tips will help you get there.
Light is paramount.
Stand facing a large window with soft, even illumination.
Avoid overhead office lighting. It casts the kind of shadows that make everyone look exhausted and faintly haunted. Not ideal when you’re trying to win new clients.
Keep the background simple and uncluttered.
A plain wall, tidy bookshelf or clean office space works beautifully.
Remove anything distracting or unprofessional from the frame. Yes, that includes the novelty mug your kids gave you, charming as it is.
Dress in solid colours that suit your skin tone.
Busy patterns can distract from your face. Bright whites sometimes confuse the camera’s exposure.
Your expression should be confident but warm.
Think “welcoming and capable” rather than “will definitely send passive-aggressive emails.”
A gentle, closed-mouth smile often works well for professional contexts.
Frame yourself from the chest up with a little headroom above you.
Centre yourself or use the rule of thirds for a more dynamic composition.
Consider using portrait mode for that subtle background blur.
It looks professional without needing to hire a pro photographer just for your LinkedIn headshot.
Not that there’s anything wrong with that. But sometimes you just need a decent photo at 9am on a Tuesday and the photographer on speed dial isn’t an option!
How to Take a Good Selfie on iPhone vs Android
Both platforms offer brilliant camera capabilities. But there are a few differences worth knowing about.
iPhone Selfie Tips
The front-facing camera on recent iPhones is excellent. But the rear camera is still sharper.
Use the timer function (find it in the camera settings or swipe up on the viewfinder) and the rear camera for the best quality selfies.
Portrait mode works well for selfies but needs adequate light.
In dim conditions, you may get better results with the standard photo mode. Portrait mode tends to struggle and produce some rather creative interpretations of where your face ends and the background begins.
Burst mode (hold down the shutter button) captures multiple frames quickly. Brilliant for catching natural expressions.
Then you just scroll through and pick the one where your eyes are actually open and you don’t look like you’re mid-sneeze.
The wide-angle lens on the front camera can distort features quite dramatically.
Either hold the phone further away than feels natural, or use the rear camera at a distance with the timer.
Android Selfie Tips
Android phones vary widely. But most flagship devices have superb cameras.
Check whether your phone has a dedicated “selfie” or “portrait” mode in the camera app. It’s worth having a poke around in the settings to see what’s available.
Many Android phones include a palm gesture feature. Show your palm to the camera and it triggers a countdown.
Perfect for arm-free selfies. Much less frantic than trying to hit the button and then arrange your face into something presentable in three seconds flat.
Look for any “beauty mode” settings and use them sparingly, if at all.
Aggressive smoothing can look very artificial. We’ve all seen those photos where someone appears to have no pores, no texture, and questionable nasal structure.
If your phone has a telephoto lens, using it for selfies reduces distortion. Though you’ll need to prop the phone further away.
For both platforms: clean your lens regularly.
Seriously. A smudgy lens creates soft, hazy images that no amount of editing can rescue.
Give it a wipe on your shirt before you start. Glamorous, right?
Frequently Asked Questions
What is the trick to taking good selfies?
The single biggest trick is lighting. Face a soft, natural light source—like a window or open shade—and let it illuminate your face evenly.
Beyond that, hold your phone slightly above eye level, keep the background clean, and give yourself permission to take multiple shots.
Nobody gets the perfect selfie first time. That’s completely normal.
Even those people on Instagram who seem to nail it effortlessly? They’ve deleted forty attempts. Guaranteed.
How do you make your face look good in selfies?
Good lighting does most of the heavy lifting. But angles matter too.
Turn your face very slightly rather than shooting straight on. Tilt your chin gently down and forward to define your jawline. Find your preferred side through a bit of experimentation.
Relaxing your face and shoulders before you shoot also helps enormously. Tension shows up instantly in photos, making you look uncomfortable even if the lighting is perfect.
What is the most flattering way to take a selfie?
The most flattering selfies tend to be taken in soft natural light. The camera should be positioned slightly above eye level and far enough away to avoid wide-angle lens distortion.
Propping your phone up and using the timer lets you step back, use the sharper rear camera and actually relax your body.
This combination produces results that look natural, confident and genuinely like you. On a good day, admittedly, but that’s rather the point.
How do you take a good selfie when you’re older?
The same principles apply at any age.
Soft, even lighting is essential. It minimises harsh shadows and creates a natural, flattering glow.
Avoid direct sunlight or overhead lighting, which can emphasise texture and create under-eye shadows.
A camera angle at or just slightly above eye level tends to work beautifully.
Skip heavy filtering and embrace the polish of good lighting and thoughtful composition instead. It makes far more difference than any smoothing tool ever could.
How to take a good selfie on iPhone?
Use the rear camera with the timer function for the sharpest results and least distortion.
Face a natural light source like a window. Tap the screen to focus on your face. Take multiple shots using burst mode if needed.
Portrait mode adds a professional touch in good lighting but can struggle in dim conditions and produce some questionable edge detection.
Clean your lens before you start. It makes more difference than you’d expect.
How to take a good selfie on Android?
Most Android phones have excellent cameras. The key is learning your specific device’s features.
Check for palm gesture timers, portrait modes and any manual settings that let you control focus.
As with any phone, the rear camera typically produces sharper images. Use a timer or remote shutter and step back from the lens.
Good lighting remains the most important factor regardless of your device. It trumps everything else.
How do you take a good selfie in the mirror?
Mirror selfies can look fantastic when done thoughtfully.
Clean the mirror first. Smudges and dust show up more than you’d think. Nothing ruins the aesthetic quite like a mysterious fingerprint hovering across your face.
Stand at a slight angle rather than square-on for a more dynamic composition.
Hold the phone to one side rather than directly in front of your face. Look at the phone screen in the mirror rather than at the camera lens itself.
Natural light from a nearby window produces much better results than harsh bathroom lighting. Which is universally unflattering to everyone who has ever existed.
How do you take a good full-body selfie?
Full-body selfies work best when you prop your phone up and step back.
Trying to fit your whole body in frame at arm’s length is a recipe for bizarre proportions and a very tense expression.
Use a timer. Lean the phone against something stable (or use a tripod selfie stick). Give yourself enough distance to fit your whole body in the frame comfortably.
The rear camera produces less distortion than the front camera. This is especially noticeable in full-length shots.
Angle the phone very slightly upward from waist height to elongate your proportions naturally.
How do you take good selfies when you’re not photogenic?
Here’s the honest truth: “not photogenic” usually just means you haven’t yet learned what works for your face.
And I say this as someone who has definitely had days where I’ve looked at a photo and thought “surely not—that can’t be right.”
The biggest myth in photography is that you’re either born photogenic or you’re not. It’s simply not true.
Experiment with different lighting directions, angles and expressions until you find combinations that feel right.
The techniques in this guide work for everyone. They’re not about being naturally beautiful. They’re about understanding how cameras see us and making small adjustments accordingly.
I’ve taught hundreds of self-described “unphotogenic” women to take photos they genuinely love.
What is the best time of day to take selfies?
For outdoor selfies, golden hour—the hour after sunrise or before sunset—produces the most beautiful, flattering light.
The warm tones and soft shadows are universally lovely. They make everyone look like they’re on holiday somewhere glamorous. Even if they’re actually standing in their back garden.
For indoor selfies, daytime hours when natural light floods through windows give you the best results.
Avoid harsh midday sun outdoors or dim evening conditions indoors unless you have good artificial lighting set up.
How do you take a good selfie for LinkedIn or professional profiles?
Keep it polished and approachable.
Face a large window for soft, even lighting. Choose a clean and simple background. Dress in professional attire with solid colours.
Your expression should convey warmth and confidence. A gentle smile works well, though not so enthusiastic that you look slightly unhinged.
Frame yourself from the chest up. Ensure the camera is level with your eyes.
Consider portrait mode for a subtle background blur that looks professional without being over the top.
You’ve Got This
Taking good selfies isn’t a gift reserved for influencers and twenty-somethings with perfect bone structure.
It’s a skill. And like any skill, it improves with repetition. The more you practise how to take a good selfie, the more second-nature it becomes. And the more easily you’ll find angles, expressions and lighting that feel authentically you.
I’ll be honest: I don’t always love photos other people take of me. In fact 90% of the time I reeeeeally don’t like them!
Different photographers, different lenses, different angles—they all capture us differently.
I generally prefer the photos I take myself because I can position myself exactly how I want and, frankly, look a lot slimmer than I do when someone else is in charge.
I’d prefer to believe that version is reality. And you know what? That’s one of the reasons I love self-portraits and why I teach other women to take their own.
Being in control of your own image is genuinely empowering.
Here’s something else I’ve learned: I look back at photos from ten years ago—photos I cringed at the time—and I think “actually, I looked really good then.”
I was certainly ten years younger.
We’re always so much kinder to ourselves in hindsight. So in ten years, you’ll look back at photos from now and think the same thing.
Take the photos anyway.
And if you’re having a day where you feel stressed or down or a bit bigger than you’d like—take them anyway.
If you hate them, delete them. If you don’t like them, don’t show anyone. But give it a go.
Treat it like a hobby rather than a test. Take the pressure off and just see what happens.
Because here’s the thing I really want you to hear: you are so much more loved than you think.
People want to see who you are and know about you.
If you stay invisible because you’re worried about how you look in photos, there are people out there who would really benefit from knowing you exist. And that is a shame. (You can imagine me looking sadly at you, and shaking my head slowly).
Not to go all deep on you or anything, but there’s a quote I love that says trying to photograph a sunset or the moon never quite captures the beauty of the real thing. I wish I could remember where I saw it, but it was very good!
Sometimes photos of us are like that too. You’re not unphotogenic. Photos just don’t always capture how lovely you actually are. That’s what I’m telling myself anyway.
If you’d love guided video lessons to help you take your own flattering photos with confidence, my course Slay Your Selfies is designed to make the whole process simple and fun.
But whether you go it alone (bad idea) or want a little extra support (that’s the right answer), I hope this guide has shown you that beautiful selfies are absolutely within your reach.
Now go find some lovely light and dazzle them all you fabulous feast of delightfulness!